This article was originally published on Botium’s blog on June 28, 2020, prior to Cyara’s acquisition of Botium. Learn more about Cyara + Botium
This tutorial provides step-by-step instructions on how to set up Botium Box with Perfecto Mobile and Perfecto Web to run continuous End-To-End tests for a chatbot published on a website.
Test Levels
Due to the nature of conversational AI, it is vital to understand the concept of test levels to design efficient test strategies. This picture shows a typical chatbot architecture:
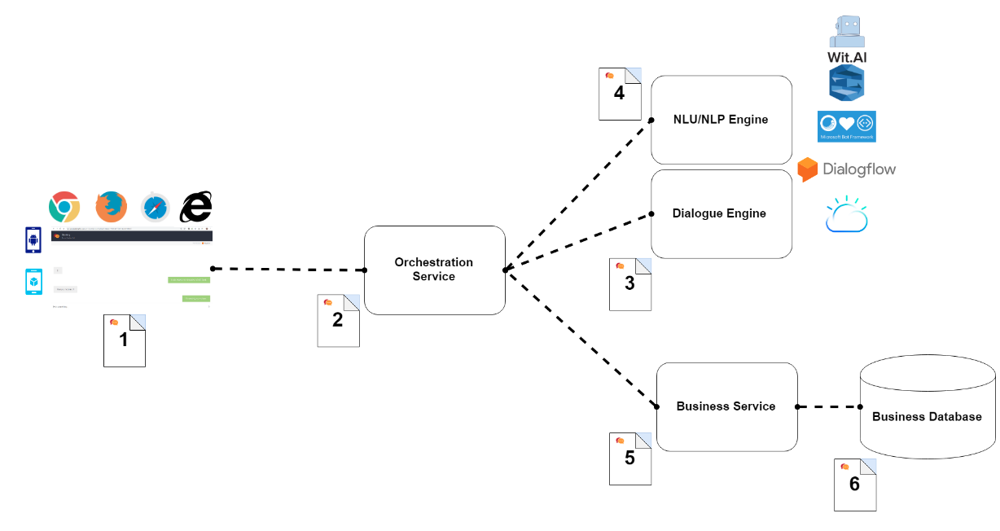
- There is a user frontend hosted as a chat widget on a website
- The frontend connects to a backend service (often called Orchestration Service) with web protocols — HTTP(S), JSON, Websockets
- Somewhere behind, there is an NLP model to convert user input to structured data with intents and entities
- An additional component is handling the dialogue sessions.
- And finally, there are some kind of business services, often backed by business databases
Botium supports End-To-End-Testing with a Webdriver Connector, combining the power of Selenium’s web browser automation with Botiums chatbot testing superpowers. The chatbot is tested by doing, pointing, and clicking and typing on a website just as a real user would do. As part of a test strategy, there are several scenarios that can and should be covered with End-To-End-Testing:
- Validating browser/client compatibility
- Smoke Tests before going live
In this article, I will use one of the “Corona Bots” out there providing information about the Covid-19-Pandemic. It has a clean user interface with some quick responses, a text input field, and a chat history window.

Step 1: Connect Botium to the Perfecto Cloud
Follow the instructions in the Perfecto Documentation to connect Botium to the Perfecto Cloud.
Step 2: Choose Device or Browser Configurations
Follow the instructions in the Perfecto Documentation to register a set of devices or browser configurations you want to test with.
Step 3: Connect Botium to the Chatbot Website
Regardless of what channel the chatbot is published on, chances are high that Botium can connect to it – there are over 30 technologies supported right now, and the number is growing. In this case, we can select the WebdriverIO technology, and tell Botium the web address where the chatbot is published.
Note: this chatbot is using the Microsoft BotBuilder Webchat widget, which is natively supported by Botium. For other, custom widgets it is required to tell Botium the Selenium selectors of the input and output DOM elements.
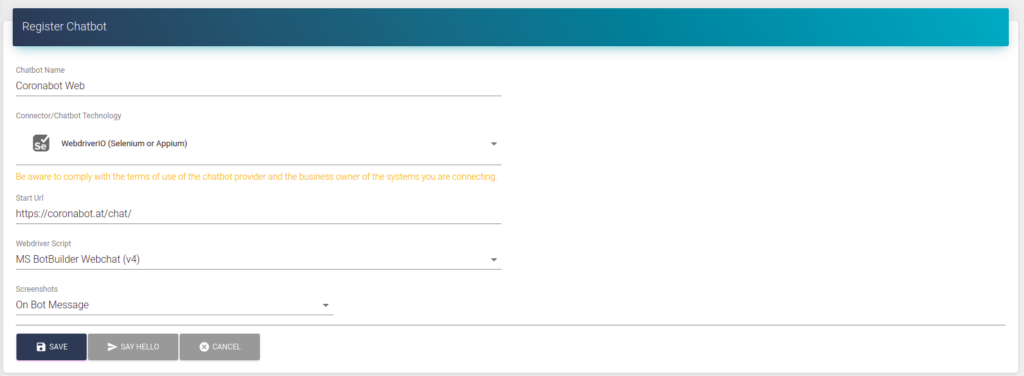
You can click the Say Hello button to check connectivity immediately – Botium uses an integrated headless chrome to launch the website, sends a simple Hello to the chatbot and waits for the response.
Step 4: Define the Botium Test Cases
Test Cases in Botium are defined in a domain-specific scripting language called BotiumScript – plain text files holding the logic to send user input to the chatbot and what to expect as an outcome.
ask-for-corona-protection

#bot
Hallo, bitte stellen Sie mir eine Frage zum Corona-Virus und ich versuche sie zu beantworten!

#bot
Oft gestellte Fragen:
BUTTONS WOHER KOMMT DAS VIRUS?|WELCHE SYMPTOME GIBT ES?|WIE KANN MAN SICH SCHÜTZEN?

#me
WIE KANN MAN SICH SCHÜTZEN?

#bot
Um generell die Ausbreitung von Infektionskrankheiten der Atemwege zu vermeiden
This sample test case named ask-for-corona-protection will first wait for two greeting messages from the bot (also see the screenshot of the chat window above) – the second one should contain some clickable buttons – then send some text to the chatbot and wait for a response. There is also a test case designer in Botium Box for visualizing the conversation flow.
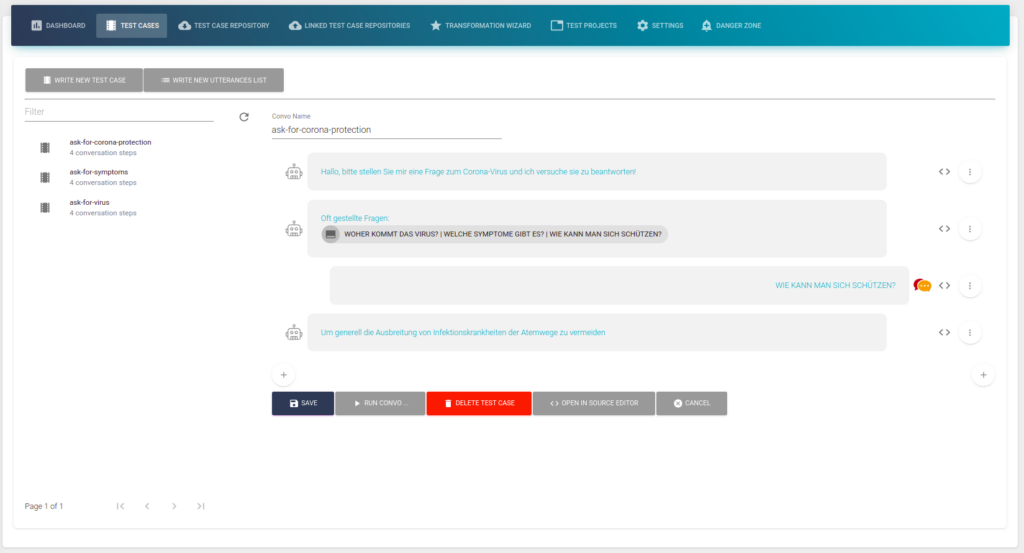
Several test cases are collected in a Test Set in Botium Box.
Step 5: Prepare Botium Test Project
The basic execution unit in Botium Box is called Test Project. It combines everything from the previous steps:
- The chatbot channel to use
- The test cases to run
- The devices or browser configuration to launch the chatbot on
Open the Quickstart Wizard and follow the 3 steps.


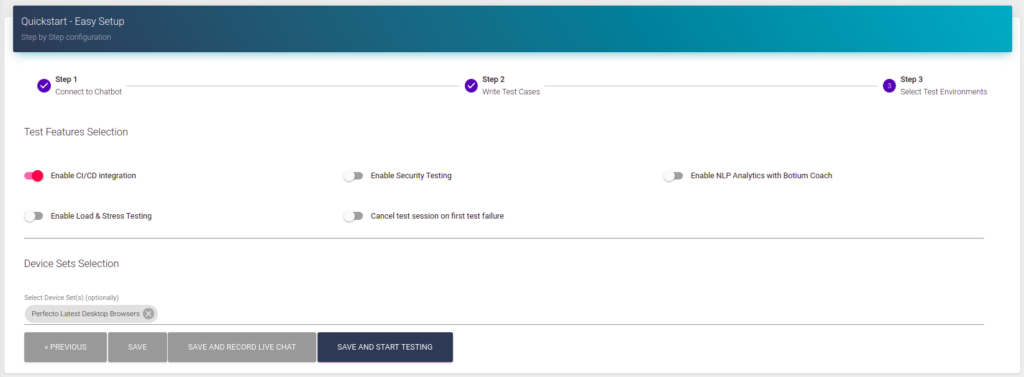
On the final step, don’t click on Save and Start Testing, but on the Save button – there is one additional step to do before launching our first test session.
Step 6: Connect Botium to the Perfecto Test Reporting & Analytics Dashboard
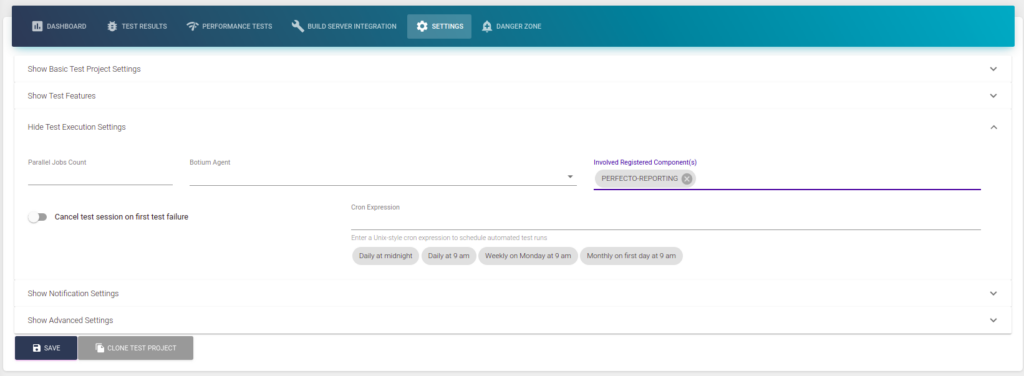
Perfecto has a very powerful test reporting & analytics dashboard. We have to connect Botium to this dashboard to keep Perfecto up to date about executed test cases and test results. Open the Settings tab in the Test Project, expand the Test Execution Settings and add PERFECTO-REPORTING to the Registered Components list.
Step 7: Launch a Test Session
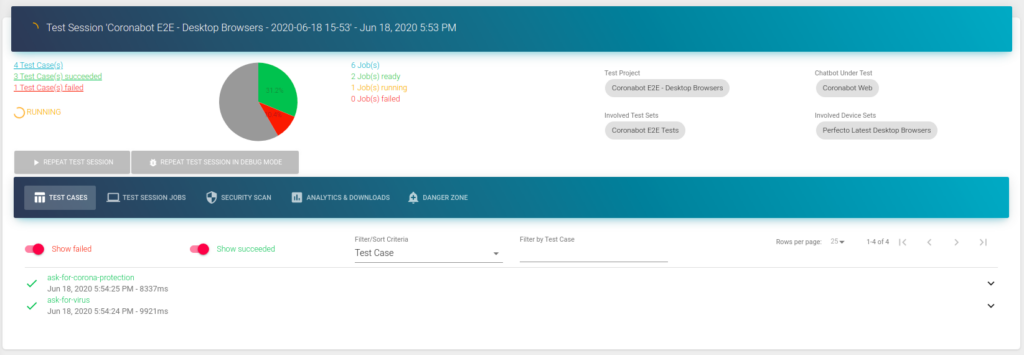
Now head over to the Test Project dashboard and click the Start Test Session Now! button. You can watch the test session while it is running.
Step 8: Inspect Results
When the test session is finished, you can start to inspect the results in Botium.
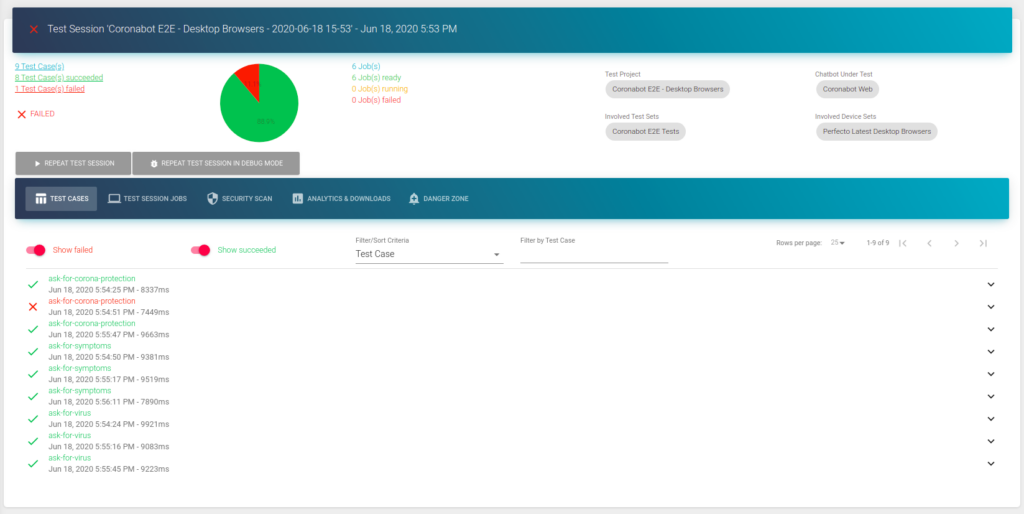
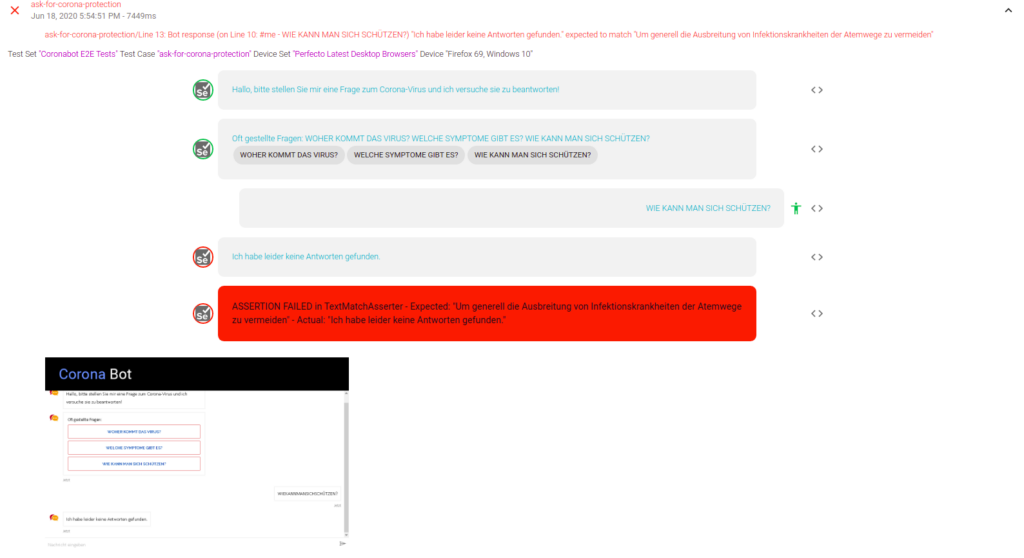
For each test case, there is the full visualized conversation transcript shown, as well as a screenshot from the browser. When expanding a failing test case you can immediately see the reasons for failing (in this example, there is a problem with the German umlaut in Firefox on Windows).
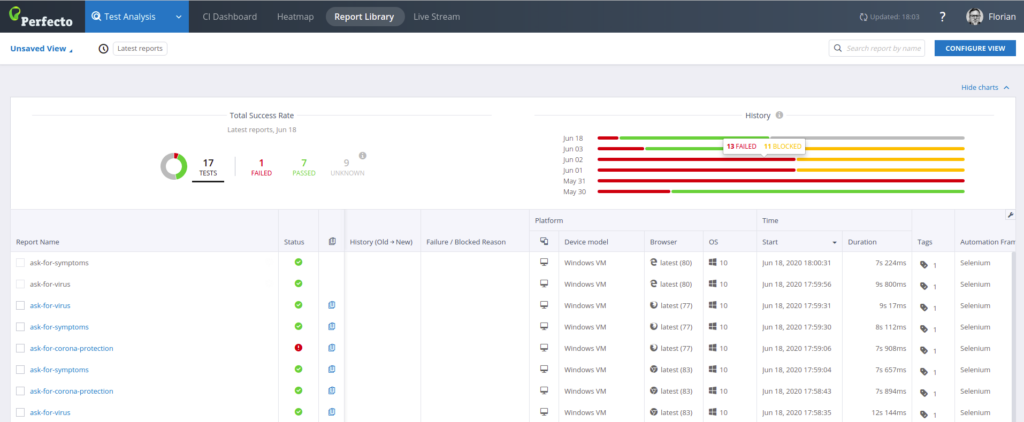
Head over to the Perfecto Test Analysis Dashboard to have deeper insights into recent test sessions, device lists, and more.
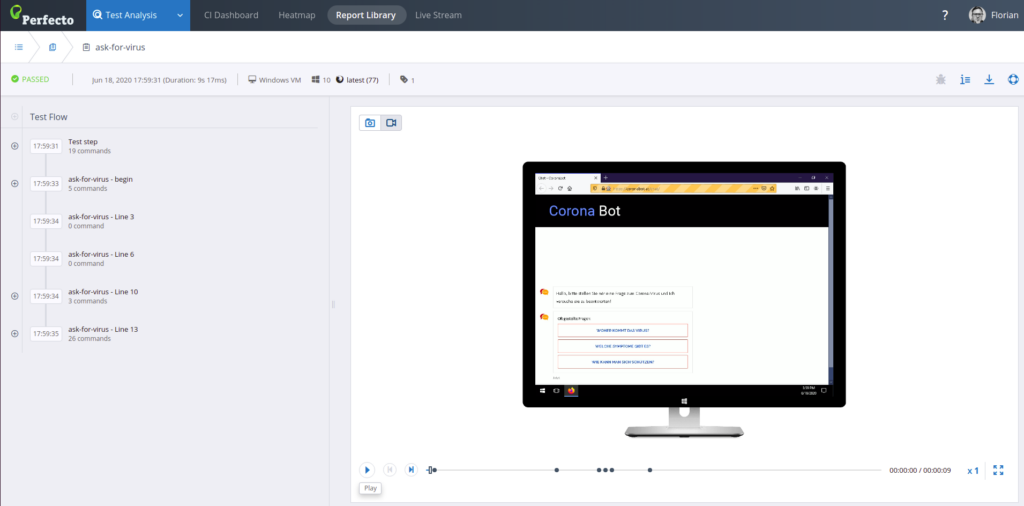
You can follow the conversation flow of each test case and even watch the full-screen recording there in order to trace down any failures.
Next Steps
There are so much more things to discover in Botium, this was just the beginning.
- You can now setup your CI/CD pipeline for automated regression testing
- You can start to explore other test levels such as NLP/NLU analytics with Botium Coach.
- Or you can add performance testing and security testing to your pipeline as well